Friday, December 31, 2010

Countdown to 2011: Desserts

You knew it was coming.

The dessert-crazy lady has gone.....indeed......crazy.

I was not capable of choosing one or five or even 10 favorite desserts from this past year....and there were many more that I managed to leave off the list but still enjoyed immensely.

You may notice there's a lot of chocolate on this list.  And a lot of cream cheese.  Hmmm.  What does that say about me?

I'll tell you just a smidge about why I loved each one of these.

 Celebration Chocolate Cake 
Our Christmas dessert last year....but I didn't technically post the recipe until January. This cake was so moist, so chocolaty, the frosting was the perfect consistency and the ganache on top just took it over the edge.  I snuck little slices of it when all the guests had gone to bed.  It was that good. 

 Double Chocolate Raspberry Cheesecake
I invented this cheesecake for Grant's birthday in January.  He has in fact requested it again for his birthday next week!  I  will be making extra raspberry sauce to serve on top.....and can't wait to taste it again.  

These were just so wonderful.  Delicate caramel flavored cheesecake.....perfectly smooth ganache that sliced into little squares like a dream....these were an ideal finger dessert for a large party.  And this was my first accepted photo on foodgawker.  :)

I seriously need to make these again.  They were wonderful.  The cookie was so nicely paired with the soft marshmallow and the frosting (which was addictive on its own).  Yum. 

I made this for my birthday.  We hadn't had it in a couple of years, and it was just as good as I remembered...chocolate crust, gooey caramel with pecans, chocolate cheesecake, ganache, and topped with more caramel and pecans.  It will always be one of my favorite desserts ever. 

What's not to like?  Graham cracker crust with mini chocolate chips - Check!  Vanilla cheesecake - Check!  Chocolate chip cookie dough - Check!  Drizzle of chocolate - Check!  Major winner of a recipe.  

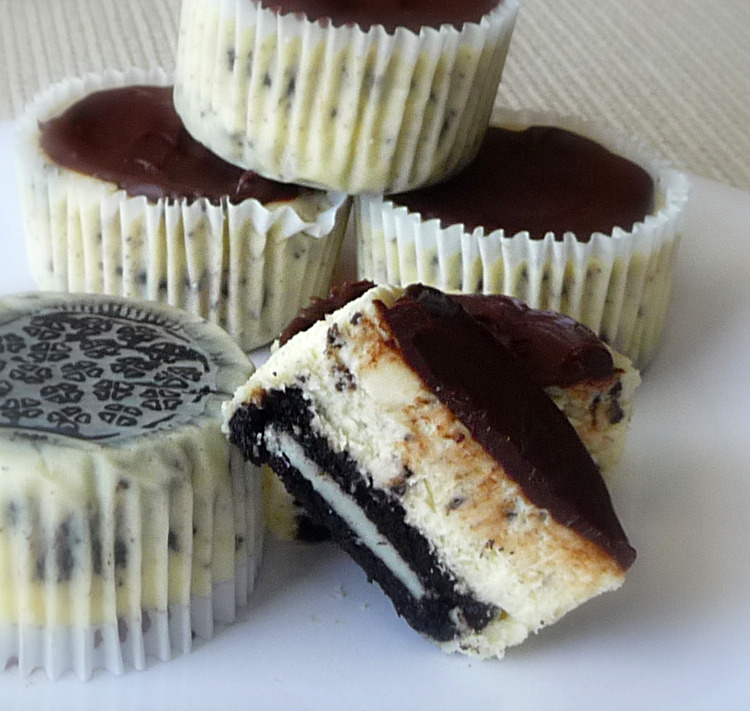
If you're an Oreo lover, these are great!  I especially loved how easy the crust was - hahaha!  The portion sizes are small and portable, which is really nice.  So much fun!

Ahhh, one of the all-time favorite flavor combinations.  Chocolate and peanut butter.  Add in cheesecake and it's a match made in heaven.  

I included this because the base brownie recipe (minus the added graham crackers and marshmallows that make it "S'Mores") is hands-down the best brownie I've ever eaten.  I couldn't get enough.  The add-ins didn't hurt anything, but boy howdy.  Those brownies. 

Made lower fat with applesauce replacing the oil, this cake is super moist, light, flavorful, and perfect for summer.  It's especially popular with ladies.  I was glad Grant wasn't crazy about it, because that left more for me.  I loved it. 

Yes, another recipe with brownies and marshmallows.  What is my deal?  
Oh but these are just so good, I could barely stand it.  The kids thought they were top-notch as well.  As did the recipients of a tray of them...even the non-chocolate eater.
  
I love pumpkin.  And obviously, I love cheesecake.  They're perfect together....and with some whipped cream, sugared pecans, and a caramel drizzle, it's the best ending to a Thanksgiving meal I could want. 


This is really over the top. It was time-intensive and not one of the easiest things I've ever made, but it was amazing.  A layer of brownie, chocolate mousse, then chocolate cake, all covered and decorated with chocolate ganache.  

Raspberry Chocolate Cake
Our truly fabulous Christmas dessert......stay tuned for the recipe coming soon!

Be sure to check out SnoWhite's Countdown to 2011: Desserts for more tantalizing meal-enders!

Thursday, December 30, 2010

Countdown to 2011: Main Dishes

I had a hard time picking favorite main dishes for SnoWhite's Countdown.....we had quite a few new ones this year that we really liked.  I ended up choosing the ones that the whole family liked, which is saying a lot when you have four kids 7 and under.

In no particular order:


Barbecue Meatballs (can also make into Meatloaf)

Be sure to go check out the other main dishes at the Countdown to 2011: Main dishes
and stay tuned tomorrow for my list of favorite desserts from this year.  

P.S.  It will not be a short list. 

P.P.S.  I have the hips to prove it.


Tuesday, December 28, 2010

Kids Say the Darndest Things....

We got a really nice snow on Christmas night and the next day.  Ended up with 8-10 inches.  That's pretty unusual around here.....and this area hadn't had snow on Christmas since 1948! 

This was taken early Sunday morning.....it continued to snow all day and into Monday....amazing!

Today it was finally warm enough for the snow to pack well and Corban (7), Marissa (5) and I were making a little snow family in the front yard.

I was working on the snow mama's face when the following conversation occurred.

Corban: "Mom, can you make two snowballs?"

Me: "No, I'm busy right now."

A minute passes.  Corban is standing near me, doing nothing.

Corban: "Mom, can you make two snowballs?"

Me: "Why?  You can make snowballs just fine."

Corban: "To put right here and here. (he points to two places on the upper chest of the snowwoman. Bosom area. You get the idea.)  Last year when we made the snow family we did that."

Me: Stunned silence.  I had not participated in the building of the snow family last year and was unaware of such doings.

I thought for a moment, then made two snowballs and placed them in the proper places on the snow mama's chest and started trying to make it look discreet. 

Marissa: "What are those?"

Corban: "You know......those things on women that grow really large and are all swollen-looking."

(Ahem. Apparently he's been looking at other women, because the description "really large" wouldn't be used by anyone in reference to me. Except for possibly the first 2 weeks after having a baby.  TMI, I know. Sorry.)

Marissa:  "You mean those things with n*pples on them that babies drink milk out of?"

Corban: "Yeah, those".

I managed to conceal my laughing.....just barely.

Countdown to 2011: Soups/Stews

I'm participating in SnoWhite's Countdown to 2011 - where each day bloggers highlight our favorite recipes from 2010 in a few categories.

December 26 was Breakfast:   There were lots of great entries....check them out!

I submitted Clone of a Cinnabon Cinnamon Rolls.......one of my favorite things to eat.  Ever.


and Biscuits with Chocolate Gravy. Because how can you go wrong with an excuse to eat chocolate for breakfast?


There are others I love....but I just didn't have time to submit them all. :)

December 27 was Breads:

I submitted Italian Cheese Bread.  Truly delicious.  Definitely a favorite. The kids LOVE this.


December 28 (today!) is Soups/Stews.  As I browsed my archives, I realized I didn't make very many new soups or stews this year.  Hmmmm.  Guess I tend to rely on the old favorites a lot.
One of those is Potato Soup.  Simple and yummy.


Another one we like a lot is White Bean Chicken Chili.  Not too spicy, but definitely has some kick.


Tomorrow is supposed to be Meatless Main Dishes....I'm afraid I don't make any of those....so I'll just have to skip a day.  But I'll be back on the 30th for Main Dishes and for sure on the 31st for Desserts, although I don't know how I'll pick my favorites.  Too many options!

Monday, December 27, 2010

Sausage Egg Casserole


This has become our family's Christmas morning breakfast, along with Clone of a Cinnabon cinnamon rolls.  Well, at least for the past two years...is that long enough to be a tradition? 

I love it because it's easy to prepare, doesn't have a long list of ingredients, and best of all, it's delicious.

I like to brown up the meat the day before and on Christmas morning, I just throw the other ingredients together, add the sausage, and bake while we're opening some presents.  Works great for us!

Recipe: (from Allrecipes)

1 lb. sausage (I've used maple sausage and turkey sausage..both excellent)
1 lb. frozen southern-style hash browns, thawed
6 eggs
1/2 c. milk
4 green onions, chopped
1-1/2 c. shredded cheddar cheese
salt and pepper to taste

Preheat oven to 350°. 
In a large skillet, brown sausage over medium heat until no more pink remains; drain.
Beat eggs with milk in a large bowl, then add all other ingredients and stir to combine.  Pour into a greased 13 x 9" pan.  Bake for 40-50 minutes, or until set and lightly browned. 

Sunday, December 26, 2010

Spicy Sausage Dip


I made this for a little party recently and it was a big hit.  It's very easy, very tasty, and a nice alternative to this sort of dip for those who don't want to use or have access to Velveeta.

Recipe: (from Annie's Eats)

1 lb package sausage, your favorite (I used mild turkey sausage)
2 (8 oz) packages cream cheese
1 (10 oz) can diced tomatoes with green chiles, undrained
1/2 c. salsa (I used hot)
Hot sauce - to taste

Brown sausage in a large skillet until no pink remains; drain.
Cut up cream cheese into cubes and add to sausage with tomatoes and salsa.  Stir over medium heat until melted and combined.  Add hot sauce to taste.  I also added a little salt and pepper.

Serve with desired chips or crackers; we loved the Fritos Scoops.


This post is linked to Life in a Shoe - 4 Moms: Snacks and Appetizers for a Crowd

Friday, December 24, 2010

Merry Christmas 2010!


May God bless you this Christmas and always! 

Grant, Rebekah, Corban, Marissa, Annika, and Ellia
with Monty the Wonder Dog.

P.S. Would you believe we got this photo with one shot?  We were in a hurry to get to church and only had time for one photo.  This was it.  We were pretty pleased!

Thursday, December 23, 2010

Chicken Enchilada Pasta


Chicken Enchilada Pasta?  Really?

It's delicious.  Really.

Well, the middle 2 girls weren't crazy about it, but the baby loves it!  She shovels it down faster than I can put it on her tray!  Grant and Corban and I decided it was added to our "favorites" list for sure.

Next time I might try it with homemade enchilada sauce just for health reasons.....I don't have a recipe for green sauce, but I'll be on the look-out.  I might even add a little cilantro to it.....if I have it.  But it's wonderful as is....and very easy to make.


Recipe (adapted from Mel's Kitchen Cafe)

1-1/2 lbs. boneless skinless chicken breasts (can use leftover cooked chicken if you have it)
2 tablespoons olive oil 
2 garlic cloves, finely minced
1 medium onion, diced
1 red  or green pepper, diced (I used green)
4-ounce can diced green chilies
1/2 teaspoon salt
2 teaspoons chili powder
1 teaspoon cumin
1 (10-oz) can green chili enchilada sauce (I used mild)
1 (10-oz) can red enchilada sauce (I used mild)
1 can large black olives, cut in half (optional - I did not include)
1 cup sour cream
1- 1/2 cups shredded cheese (I used sharp cheddar)
13.25 oz box whole wheat penne (or desired pasta)
Cut chicken breasts into bite-sized cubes, salt and pepper to taste and cook in a large skillet with a T. of oil until done.  Remove from pan.

Bring a large pot of water to a boil. Cook the pasta until tender.

While the pasta is cooking, heat the oil in a large nonstick skillet and add the onion. Cook for 2-3 minutes until onion is translucent. Add the garlic and red/green pepper and cook for another 2 minutes, until pepper is barely tender. Add the cooked chicken, green chilies, spices, enchilada sauces and olives. Let the sauce simmer for about 8-10 minutes. Add the sour cream and cheese and heat through, until the cheese is melted (but don’t boil!). Pour the sauce over the hot pasta. Garnish with extra sour cream, cheese, diced tomatoes, green onions or crushed tortilla chips.

Linked to Finding Joy in My Kitchen (Ingredient Spotlight: Chicken and Pasta)

Tuesday, December 21, 2010

Buck-Eyes


Can you stand one more candy recipe?  This is one of the best ones, no kidding. Everyone who tries them loves them and doesn't want to stop munching.....which could be a bad thing, if you have a tray sitting in your fridge calling your name all day.

There are tons of variations on this recipe out there...some include graham cracker crumbs, some have more butter, or more peanut butter, or more sugar, etc etc.  I can't say for certain that this is the best one....because I just didn't have the time or room in my pants to try them all, but this one is good enough that I don't feel compelled to try another one.

Note: The original said to stick a toothpick in each ball before chilling....but I thought that was wasteful of toothpicks and found that it worked just fine to just re-use the same toothpick for dipping.....as long as the peanut butter balls weren't too large and heavy.  

Recipe: (adapted from Allrecipes.com)

1-1/2 c. creamy peanut butter
1/2 c. butter, softened
1 t. vanilla extract
3 c. powdered sugar
1-1/2 c. semi-sweet chocolate chips
2 T. shortening

Directions:
In a large bowl, combine peanut butter, butter, vanilla, and powdered sugar until completely incorporated.  If mixture is too stiff, add a little more peanut butter.  If it's too sticky, add a little more powdered sugar.  You want it a nice consistency that you can easily roll balls of it without it being all stuck on your hands.  

Roll balls of desired size and place on a cookie sheet covered with wax paper.  If desired, insert a toothpick into each ball.  (See note above).  Chill in the refrigerator or freezer for at least an hour.  

Melt the chocolate chips and shortening in a glass bowl in the microwave (or use a double boiler) just until melted and you can stir it smooth.  

Dip each ball into the chocolate, not covering all the way.  Place on the wax paper and remove the toothpick. There will be a hole....no worries!  Continue until all the balls are dipped. 

You can go back with your clean fingers and carefully smooth over the holes.....it won't be "perfect", but it will look much better, and believe me, once people taste these, they won't care what it looks like!

Chill the balls until the chocolate is set.  Store in the refrigerator.  

Monday, December 20, 2010

Divinity


I have many fond memories of my Grandma....whom I loved very dearly and who went to meet Jesus back in 1998.  She was 80 years old; I was 20.  

As a child, I loved eating the fruits of her labor in the kitchen, as she was a wonderful cook.  Thankfully, as I entered my later teen years, I had the sense to recognize that she was getting older, and I didn't want to miss out on any opportunities to spend time with her and learn some of her tricks of the trade.

We always spent a lot of time at my grandparents' home around Christmas, as they only lived 20 minutes away from us.  So when Grandma set aside a day for baking her traditional goodies, I made sure to get there.  She taught me how to make peanut brittle, fudge, buck-eyes, and my favorite, Divinity.  

I don't know why I love it so much.....I have to admit that I enjoy the taste of Buck-eyes much more.....but Divinity is just special.  It's so sweet, amazingly melting in your mouth yet with the crunch and flavor of pecan bits adding interest and dimension to the softness of the fluff.  I can't explain it. 

Anyways.

I haven't had it in years.  Nobody I know makes it....and I never see it in stores.  Grant isn't the hugest fan (again, because it doesn't involve chocolate), so I always hated to make a batch and then eat it all alone. 

This year, I said "Forget it, I don't care if I'm the only person who likes it or eats it, I'm having Divinity."

And now I am.  And it makes me think of Grandma. I like to think she'd be proud of me.  Not just for making the candy, but for everything else that's happened that she never got to see.....my husband, my children, the person I've become.....darn it, I'd better stop or I'll start to cry. 

NOTES ABOUT DIVINITY:

1. Divinity takes time and patience to make......and you HAVE to have a candy thermometer.  One that works.  Be sure to test it before making the recipe by boiling some water on the stove and seeing if the temperature registers 212°F.  If it doesn't, note whether it's high or low and by how much and adjust accordingly. 

2. It's best to have all the ingredients out and ready to go.  Especially have the nuts chopped and the vanilla ready to stir in because at that point, the mixture stiffens up really fast and you can't waste any time. 

3. Divinity MUST be stored in a covered container at room temperature.  If you even have it sitting out on a tray with other goodies for too long, it will get stiff and dry (not good).  I would say leave it out for an hour maximum.  Otherwise, just store it in layers on wax paper in a pretty candy tin or something with a lid. 

4. Oh, and you shouldn't make it on a humid or rainy day....it won't set up right.  So I'm told.  I'm not willing to take the chance on it.

Intimidated yet? 

Don't be...it's not that hard, just a little finicky!  I think it's totally worth it....I hope you agree. 

I didn't have my Grandma's old recipe, for some reason, but this one I found tastes exactly as I remember hers, so I guess I picked well.


Recipe (from Allrecipes)

2 c. white sugar
1/2 c. light corn syrup
1/2 c. hot water
1/4 t. salt
2 egg whites
1 t. vanilla extract
1 c. chopped pecans (optional)


Line a cookie sheet with wax paper and set aside. 

In a heavy, 2-quart saucepan, combine the sugar, corn syrup, hot water, and salt. Stir together well and then heat to boiling, stirring occasionally until mixture comes to a boil.  Then STOP stirring and cook to hard-ball stage, 266­° F.  Mixture will look about like this.  Remove from heat.


While the syrup is cooking, begin whipping egg whites in a large mixing bowl until stiff peaks form.  This takes a few minutes and will look like this.


Pour hot syrup in a thin stream SLOWLY over beaten egg whites, (as in, take at least 4-5 minutes to pour it all in) beating constantly with the electric mixer at medium speed. (I didn't take photos of that part...all my hands were busy!).   

Increase speed to high, and continue beating for about 5 minutes. Add vanilla; continue beating until the mixture becomes stiff and begins to lose its gloss. If it is too stiff, add a few drops hot water.  Stir in pecans by hand. 

Immediately drop by spoonfuls onto prepared cookie sheet.  Let stand until set.  Store in an airtight container at room temperature.

This post is linked to the Holiday Recipe Link-Up at Raising Olives.

Saturday, December 18, 2010

"P" is for Pumpkin Cream Cheese Muffins


Aside from eating Pepperoni Pizza, Pancakes, Pretzels, Pickles, Mashed Potatoes, Potato Chips, Chicken Pot Pie and Popcorn this week, we had the pleasure of delivering these Pumpkin Cream Cheese Muffins to a dear lady from church, Priscilla.  (and there are many "P" foods we didn't get to...what a fun letter!)

I adore Priscilla.  She's a grandmother of 14 and spends much of her time caring for her husband, who isn't well....and she is a faithful worker in our 3-year old nursery at church for two months out of every year.  She's just the sweetest lady....so it was really fun to get to bless her with a treat this week.

We delivered the muffins to her on Pink Paper Plates, and she in turn gave the children Peppermint candy canes.  Such fun!

These muffins are delicious, worth the extra effort and time it takes to make them. The recipe makes a big batch - it said it yielded 24 muffins, but I had enough batter left over to make 24 mini-muffins without the filling.  I even had leftover topping after that! 

Recipe: (adapted from Annie's Eats)
Yield: 24 muffins, plus 24 miniature muffins (without filling)
For the filling:
8 oz. cream cheese, softened
1 cup confectioners’ sugar
For the muffins:
3 cups all-purpose flour (I used half whole wheat)
1 tsp. ground cinnamon
1 tsp. ground nutmeg
1 tsp. ground cloves
1 tbsp. plus 1 tsp. pumpkin pie spice (I was a little short on this, but they still had plenty of flavor)
1 tsp. salt
1 tsp. baking soda
4 large eggs
2 cups sugar
1 (15 oz) can pumpkin puree
1/2 cup applesauce
3/4 cup coconut oil (or canola oil)
For the topping:
½ cup sugar
5 tbsp. flour
1½ tsp. ground cinnamon
4 tbsp. cold unsalted butter, cut into pieces
Directions:
To prepare the filling, combine the cream cheese and confectioners’ sugar in a medium bowl and mix well until blended and smooth.  Transfer the mixture to a piece of plastic wrap and shape into a log about 1½-inches in diameter.  Smooth the plastic wrap tightly around the log, and reinforce with a piece of foil. Transfer to the freezer and chill until at least slightly firm, at least 2 hours.
To make the muffins, preheat the oven to 350˚ F.  Line muffin pans with paper liners.  In a medium bowl, combine the flour, cinnamon, nutmeg, cloves, pumpkin pie spice, salt and baking soda; whisk to blend.  In the bowl of an electric mixer combine the eggs, sugar, pumpkin puree, applesauce, and oil.  Mix on medium-low speed until blended.  With the mixer on low speed, add in the dry ingredients, mixing just until incorporated.
To make the topping, combine the sugar, flour and cinnamon in a small bowl; whisk to blend.  Add in the butter pieces and cut into the dry ingredients with a pastry blender or two forks until the mixture is coarse and crumbly.

To assemble the muffins, fill each muffin well with a small amount of batter, just enough to cover the bottom of the liner (1-2 tablespoons).  Slice the log of cream cheese filling into 24 equal pieces.  Place a slice of the cream cheese mixture into each muffin well.  Divide the remaining batter among the muffin cups, placing on top of the cream cheese to cover completely.  Sprinkle a small amount of the topping mixture over each of the muffin wells.
Bake for 20-25 minutes.  Transfer to a wire rack and let cool completely before serving. That cream cheese filling gets hot!

To see the rest of our Alphabet Service Projects, click here!

Linked to Finding Joy in My Kitchen

Thursday, December 16, 2010

Gingerbread White Chocolate Blondies


These are a really nice variation from the usual brownies and blondies and incorporate the traditional Christmas flavor of ginger just beautifully.  I made them for Corban's Royal Ranger class for snack on Wednesday night and they went over very well.....and I wasn't the least disappointed to see there were some leftover when the family got home.  Even Grant is a fan.....and he usually doesn't go for ginger-flavored things much.

These will definitely go into the keeper category for Christmas-time baking.

Recipe (from Mel's Kitchen Cafe)


2 ¾ cups plus 2 tablespoons all-purpose flour
1 ¼ teaspoons baking soda
1 ¼ teaspoons salt
1 ¼ teaspoons ground cinnamon
1 teaspoon ground ginger
¼ teaspoon ground cloves
1 ¼ cups (2 ½ sticks) butter
, room temperature
1 ¼ cups packed light brown sugar
½ cup granulated sugar

2 large eggs plus 1 egg yolk
1 ¼ teaspoons pure vanilla extract
1/3 cup unsulfured molasses
1 ¾ cups white chocolate chips

Nonstick cooking spray
Preheat oven to 350 degrees F. Prepare a 13×9 baking dish with cooking spray and set aside (I lined my pan with aluminum foil and then sprayed the aluminum foil with cooking spray).
Whisk together flour, soda, salt, and spices in a bowl.
In the bowl of an electric mixer fitted with the paddle attachment (or with a hand mixer), beat butter and sugars on medium-high speed until creamy and pale, about 3 minutes. Add eggs and yolk one at a time, scraping down sides of bowl as needed. Add vanilla and molasses and mix on medium speed until combined.
Add flour mixture on low speed until combined. Stir in white chocolate.
Spread batter evenly into prepared pan and bake until golden around edges and toothpick comes out clean, about 25 minutes. Let cool completely in pan; cut into 24 squares. Blondies can be stored in airtight containers at room temperature up to 1 week.

Wednesday, December 15, 2010

Loaded Peanut Butter Cup Cookies


Ridiculous.  That's what these are.....just ridiculous!

Chocolate peanut butter cookies filled with peanut butter chips, chocolate chips, and mini Reese's pieces, and half of a Mini Reese's Cup smack dab in the middle.  Seriously!  I mean, what's not to like?

My only complaint was that the cookie itself wasn't as chewy as I would prefer....more of a crumbly texture....but that could be entirely my fault.  I may or may not have neglected to verify the amount of peanut butter called for in the recipe before adding it in....and I may or may not have neglected to measure it anyways.  All to say, I think I added too much peanut butter.  Ooops.  Well, they still turned out delicious and
I'm sure they'll be a hit at the party I'm taking them to this weekend.  (They're hanging out in the freezer in the meantime.)

Recipe: (from Mel's Kitchen Cafe)  

1 c. butter, softened
3/4 c. peanut butter
3/4 c. white sugar
3/4 c. packed brown sugar
2 eggs
1 t. vanilla extract
2-1/3 c. all-purpose flour
1/3 c. baking cocoa
1 t. baking soda
1 c. semi-sweet chocolate chips
1 c. peanut butter chips
1 c. Reese's Pieces
20-25 mini Reese's peanut butter cups, cut into halves and frozen


Preheat oven to 350°F. 
In a large bowl or stand mixer, cream together the butter, peanut butter, white sugar, and brown sugar until smooth. Beat in the eggs one at a time, then stir in the vanilla. Combine the flour, cocoa, and baking soda; stir into the peanut butter mixture. Mix in the chocolate chips, peanut butter chips, and Reese’s Pieces (this is best done by hand so the shells of the Reese’s Pieces don’t get broken).
Drop by tablespoonfuls onto cookie sheets lined with parchment paper or silpat liner. (I used parchment mostly, but found it wasn't really necessary.)  Push one peanut butter cup half into the center of each ball of dough. Bake for 8 to 10 minutes.  Let cool for 1 or 2 minutes on sheet before removing, or they will fall apart.

Monday, December 13, 2010

Chocolate Overdose Cake


This is truly one of the richest and most decadent desserts I have ever made.  Not for the faint of heart, or the watchers of waistlines, or the non-chocolate lover.    Thankfully for me, I fit into exactly none of those categories.  Well, not when this cake is in front of me, anyways.  

Consisting of a brownie layer, chocolate mousse, chocolate cake, and a thick layer of chocolate ganache covering the whole thing, it has nearly 2 lbs. of chocolate in it, not to mention almost a quart of cream and a significant amount of butter.  

Did you catch that part about not being for the watchers of waistlines?  

But boy, is it worth it. 

I have to say, of all the components, the cake layer was my least favorite.  It was good, but not great.  Maybe I overbaked it a little.  Who knows.  But the mousse?  Out of this world.  Combined with the brownie?  Unbelievable.  And the ganache?  Smooth, melting in your mouth delectableness.  All together?  An unforgettable dessert. 

It does take awhile to make....I made the cake and brownie on one day and the mousse and ganache the next.  Just made it easier.  

I changed the original recipe a tad, because there were several ingredients measured in 1/8th of a cup. I, for one, do not own measuring cups in 1/8 cup increments.  I made it a little simpler, and I'm sure it didn't affect the quality of the cake a bit.  

For the record:  1/8 cup = 2 Tablespoons.
  
Recipe:  (adapted from Annie's Eats)

Brownie Layer:
1/2 c. plus 2 T. cake flour
1/4 t. salt
1/2 t. baking powder
3 oz. unsweetened chocolate, chopped fine
6 T. unsalted butter, cut into 6 pieces
1 c. sugar
2 large eggs
2 t. vanilla extract

Chocolate Cake Layer:
2 oz. unsweetened chocolate, coarsely chopped
2 T. cocoa powder
1/4 c. water
1/4 c. sugar
3/4 c. plus 2 T. unbleached all-purpose flour
3/4 t. baking soda
1/2 t. salt
1/2 c. buttermilk
1 t. vanilla
2 large eggs
1 large egg yolk
1/2 c. plus 2 T. sugar
6 T. unsalted butter, soft

Chocolate mousse:
6 oz. semi-sweet chocolate chips
1-3/4 c. heavy cream
1 T. sugar

Ganache:
1-1/2 c. heavy cream
2 T. unsalted butter
18 oz. semi-sweet chocolate, chopped (I used 12 oz. chocolate chips, 6 oz. Baker's Chocolate) 
To make the brownie base, line the bottom of a 9-inch springform pan with a round of parchment paper and spray the sides with nonstick cooking spray.  Center a rack in the oven and preheat to 325°F.  In a medium bowl, combine the cake flour, salt and baking powder.  Stir with a fork to mix.  Melt the chocolate and butter in a large heatproof bowl set over a saucepan of almost-simmering water, stirring occasionally, until smooth.
When the chocolate mixture is completely smooth, remove the bowl from the saucepan and gradually whisk in the sugar.  Add the eggs one at a time, whisking after each addition until thoroughly combined.  Whisk in vanilla.  Add in the flour mixture in two additions, folding with a rubber spatula until completely homogenous.
Transfer the batter to the prepared pan and smooth with a spatula.  Set aside, prepare the cake batter, and bake the two layers at the same time.
To make the cake, line the bottom of a 9-inch round cake pan with a round of parchment paper.  Grease and flour the sides of the pan.  Combine the chocolate, cocoa and hot water in a medium heatproof bowl; set the bowl over a saucepan containing 1-inch of simmering water and stir with a rubber spatula until chocolate is melted, about 2 minutes.  (Note: at this point, my mixture was pretty thick, but mixing in the sugar was like magic and it made it smooth and liquidy again.)  Add 1/4 cup of sugar to the chocolate mixture and stir until thick and glossy, 1 to 2 minutes.  Remove bowl from heat and set aside to cool.
Whisk flour, baking soda and salt in a medium bowl; set aside.  Combine buttermilk and vanilla in a small bowl.
In the bowl of a stand mixer fitted with the whisk attachment, whisk the eggs and yolks on medium-low speed until combined, about 10 seconds.  Add 1/2 c. plus 2 T. sugar, increase speed to high, and whisk until fluffy and lightened in color, 2 to 3 minutes.  Replace whisk with paddle attachment.
Add the cooled chocolate mixture to the egg/sugar mixture and mix on medium speed until thoroughly incorporated, 30-45 seconds, pausing to scrape down sides of bowl with rubber spatula as needed.  Add softened butter one tablespoon at a time, mixing about 10 seconds after each addition.  Add about one third of the flour mixture followed by half of the buttermilk mixture, mixing until incorporated after each addition (about 15 seconds).  Repeat using half of remaining flour mixture and all of remaining buttermilk mixture (batter may appear separated).  Scrape down the sides of the bowl and add remaining flour mixture; mix at medium-low speed until batter is thoroughly combined, about 15 seconds.  Remove bowl from mixer and fold batter once or twice with rubber spatula to incorporate any remaining flour.  Pour into prepared pan; smooth batter to edges of pan with an offset spatula. 
Bake the brownie and cake layers at the same time: the brownie for 25-30 minutes and the cake for 30 minutes, or until a toothpick inserted in the center of each comes out clean. (My cake took at least 37 minutes). Transfer the pans to a wire cooling rack.  Allow the brownie to cool completely in the pan.  Allow the cake to cool in the pan for 15 minutes, then invert onto the wire rack and allow to cool completely.
Once the brownie layer has cooled, run a knife around the edges to separate it from the pan.  Remove the sides of the springform but leave the brownie layer on the springform base.  Form a ring of parchment paper around the brownie layer and extending up the sides of the springform pan – reclose the springform so that the parchment is fitted tightly to the sides. 
To make the chocolate mousse filling, place a stand mixer bowl and whisk attachment in the freezer or fridge.  Heat 1-inch of water in the bottom half of a double boiler over medium heat.  Place the semisweet chocolate in the top half of the double boiler.  Tightly cover the top with plastic wrap and allow to heat for 8-10 minutes.  Remove from the heat and stir until smooth.  Set aside until needed. 
Place heavy cream and sugar in the well-chilled bowl of an electric mixer fitted with the chilled whisk attachment.  Whisk on high speed until stiff peaks form, about 1-1/2 minutes.  Remove the bowl from the mixer.  By hand, whisk to combine 1/4 of the whipped cream into the melted chocolate until smooth and completely incorporated.  Add the combined whipped cream and chocolate to the remaining whipped cream and use a rubber spatula to fold together. 
Spread the mousse over the top of the brownie base evenly.  Use an offset spatula to smooth the top.  Place the cooled cake round over the mousse, pressing down lightly.  Chill for at least 1 hour.
To make the ganache, heat the heavy cream and the butter in a saucepan over medium high heat.  Bring to a boil.  Place the semisweet chocolate in a 3-quart stainless steel bowl.  Pour the boiling cream over the chocolate and allow to stand for 5 minutes.  Stir until smooth.  Chill 1 cup of ganache for 1 hour.  Allow the remaining ganache to come to room temperature (about 40 minutes).
Remove the springform ring and parchment collar from the assembled cake.  Carefully transfer the cake to a serving platter, removing the springform base and parchment round.  Use a spatula to smooth the room temperature ganache over the cake top and sides, covering evenly.
Place the chilled ganache in a pastry bag fitted with a shell tip and pipe a shell border around the base of the cake.  Pipe 12-16 rosettes around the top of the cake to indicate servings.  Serve chilled and store leftovers in the fridge.  Cut the cake with a hot, dry knife.


Related Posts Plugin for WordPress, Blogger...