Tuesday, February 26, 2013

Family Update

It's been so long since I've posted a family update.....I can't possibly catch up
We're getting more settled in but still have piles upon piles of boxes and stuff in the garage.  
It's hard to get motivated to go out there and work when it's so cold and we have all the necessities for day-to day life in the house. 

Oh, and apparently the Plunger Fairy has come and taken both of our plungers and left us nothing in return.....we've had the joy of a stopped up toilet and cannot find either plunger anywhere.  Joy. 

We're missing old friends and life in Virginia.....while at the same time enjoying new activities and meeting new people here....and spending as much time as we can with family.   

 Here are a few highlights from the past month or so.

We've joined a 4-H group that has several different projects for kids to be involved with....the girls are participating in a miniature horse project and Corban is doing robotics.  

The Mini-horse project is so awesome - the leaders of the club have a farm with about 10 mini-horses (and several full-sized) and once a month, the participants get to go out to the farm and learn all about taking care of the horses.The rest of the month (and meetings) are spent learning about horsemanship, hippology terms, etc.  My girls are the youngest in the group but are absolutely loving it.  


Marissa adores Gypsy - she's so gentle and compliant, easy to lead and great with kids.


Annika practicing picking a hoof.


Annika taking her turn leading Gypsy around a course of cones.  Eventually they'll be able to compete with the horses in contests, and even learn how to drive a little cart!


These two beauties live in a pasture back behind our house....we walked there a couple of weeks ago and discovered them....the girls are in love.


Every day that the weather is nice, the girls are begging to go back to see the horses. 


Even Ellia gets in on that fun.  She's too young for the 4-H group now.


In school, we had the joy of dissecting owl pellets.  Oh, you don't know what an owl pellet is?  That's okay, I didn't either.  So when owls eat rodents, they can't digest the bones and hair.  Their stomachs form the indigestible materials into chunks, which the owls vomit out.   Owl pellets.  Lumps of rodent hair and bones. 
Theoretically, you could find an entire mouse skeleton in a single pellet....we were not so lucky. (???)


We sure found a lot of tiny bones, though.  Very interesting.  


Moving on to something much prettier, Marissa and Annika are taking ballet classes from my lovely younger sister Anna.  We have to drive 45 minutes one way to get there, but it is totally worth it.  She's amazing teacher and the girls absolutely love it.  And her. 

Well, it's only a snippet and I could post much more......but life is calling. 


Saturday, February 23, 2013

Chocolate Orange Muffins


Sometimes you just need chocolate for breakfast.
Well, I suppose "need" isn't exactly the appropriate term, but I can sure feel like I need chocolate.
Just every day. Or so.
Hmmmm. Wonder what would happen if I tried to break the chocolate addiction.
I don't want to find out.

Now, I had a feeling I would like these muffins, because although I have never actually combined chocolate and orange in baking before personally, I have tried and enjoyed the chocolate-covered orange sticks from Trader Joe's....and maybe a few other chocolate orange confections over the years.

(Can I just say, I got so spoiled living near a Trader Joe's in VA.....I miss it like crazy around here.  But at least now I have Azure Standard.....that's a huge plus.)

But I honestly had no idea how great these would be.  They might even qualify as cupcakes....except if there's no frosting, I insist they can be eaten for breakfast.  Yes, I made a huge batch, because 12 little muffins are not going to tide my hungry crew over in the morning.  Corban can eat at least 5 on his own.  Unless I'm also serving hard boiled eggs.....then he might eat 4 eggs and 3 muffins.  He's only 9 years old.  Sheesh.

I modified the original recipe by decreasing the sugar a little, adding flaxseed, and using some applesauce in place of some oil.  They turned out so moist, tender, and perfectly delicious.

Annika (5) made the comment, "When you're eating really good food, it's like music."

I think she got that quote from Ratatouille....but it was just funny to hear a five-year old saying that at breakfast.  She's never said that before, so I guess the muffins made quite an impression.

They definitely fit in the category of "really good food" to us.

Chocolate Orange Muffins 
Yield: 24 muffins (can easily be halved)

3 cups flour
1/4 cup ground flaxseed (optional)
3/4 cup sugar
4 t. baking powder
1/2 tsp. salt
2 eggs
1/2 cup melted expeller pressed coconut oil or butter
1/2 cup applesauce
1 cup buttermilk
1 cup orange juice
2 tsp. vanilla extract
Zest of 1 orange
4 T. cocoa powder
1 cup semi-sweet chocolate chips


DIRECTIONS:
Preheat oven to 325 degrees (for dark, nonstick pans) or 350 degrees for regular muffin tins. Line tins with cupcake liners or spray with cooking spray.
In a large bowl, whisk together the flour, flaxseed, sugar, baking powder and salt.
In a separate medium-size bowl beat together the eggs, oil or butter, applesauce, buttermilk, orange juice, vanilla and orange zest. Pour the wet mixture over the dry and mix together just until moistened. Don’t over mix! 
Pour half of the batter into another bowl.  Sift the cocoa powder in to one of the bowls and fold in half of the chocolate chips. Fold the remaining chocolate chips into the other “white” bowl of batter.
Drop spoonfuls of the batter into the prepared muffin tins, alternating the orange and chocolate batters. Fill the cups 2/3 full. Bake for 13-15 minutes at 350 or 17-18 minutes at 325 until a toothpick inserted in the center comes out clean. Remove from the oven and cool the muffins for five minutes in the tins. Remove the muffins to a wire rack to cool completely.
Recipe Source: adapted from Mel's Kitchen Cafe


Thursday, February 21, 2013

Chocolate Mint Cookies


When Jocelyn posted these cookies a few weeks ago, I knew I had to make them.

I rarely use cake mixes and I buy Oreos even less frequently (and had never even tried the mint ones), but I just could not resist.  My next trip to Walmart resulted in the ingredients for these cookies just hopping right into my cart and a couple of days later I had the chance to make them.

Wowzer.

First of all, mint Oreos are dangerously addictive on their own.  As long as I pretended I didn't know the ingredients or calorie count, I could seriously eat them every day and not get tired of them.

So when you chop them up and add them into a soft chocolate cookie.....and add some extra chocolate mint chips on top of that....yeah. Ridiculously good. I'm pretty sure we ate the entire batch in about a day and a half.

They're actually very similar to another one of my favorite recipes, Fudgy Mint Cookies, but with cream cheese and the Oreo chunks added.  Extra indulgence, indeed.

I gotta quit making sweets for a few weeks.....I'm afraid my calorie consumption is higher than my calorie expenditure....at least, that's what the scale is telling me.  Not the news I want when spring and summer are around the corner.

But I couldn't resist sharing this recipe with you......and probably some others that I've not gotten around to posting.

Chocolate Mint Cookies 
adapted slightly from Inside BruCrew Life
Makes about 36 cookies

1 chocolate cake mix (I used Devil's Food)
1/2 cup butter, melted
1 egg
1 teaspoon vanilla
4 oz. cream cheese, softened
1 1/2 cups mint Oreo cookie chunks
3/4 c. chocolate and mint chips OR Andes mint baking chips

In the bowl of an electric mixer, combine butter, egg, vanilla, and cream cheese.  Add the cake mix and stir well.  Add the cookie chunks and mix again. Stir in the chocolate mint pieces by hand.
Refrigerate dough for at least 30 minutes.
Preheat oven to 350°.  Roll dough into 1 to 1 1/2 inch balls. Place on un-greased baking sheet and bake for approximately 9 minutes.  Cool on the baking sheet for 2-3 minutes.  Remove to a wire rack to cool completely.  Store in a covered container.  

Friday, February 15, 2013

Chocolate Molten Lava Cakes


I have a never ending list of desserts I want to try, just because I love desserts.
And I'm a food blogger, so I always want new material to write about. 
Considering those two facts, there are many fabulous desserts that I have made once and
absolutely adored, but rarely (if ever) get around to making again.

That will not be the case with this dessert.

I can't even tell you how amazing it is.  
So rich and chocolaty, with a slightly firm and chewy exterior and edges, and a
warm, decadent, fudgy center just oozing out to coat every bite......
Grant's words as he sampled his first bite:
"You have GOT to be kidding me!"
He was simply astonished that a dessert so simple could be so delicious.

I think the best way to prepare it is to make the batter and pour it into the ramekins ahead of time. While 
you're eating dinner, pop them into the oven. When they're ready, everyone should be finished with dinner and ready for dessert.  And believe me, when you smell these baking, you'll find room for dessert, no matter how full you are. 

Oh, and I have a confession.  I actually made them with the wrong amount of chocolate and didn't realize it until I was in bed last night, thinking about the recipe. 
See, it calls for 6 ounces of bittersweet chocolate, and 2 ounces of semi-sweet chocolate. 
The Ghiradelli bars of bittersweet chocolate are only 4 ounces, so I had decided beforehand to use 4 ounces of semi-sweet chocolate instead of buying another bittersweet bar and only using half of it.  
Well, when I was actually baking it, I forgot to add the extra 2 ounces of semi-sweet chocolate, so my end result was 2 ounces of chocolate short.  
And you know what?  
You never would have known. 
 I can't imagine them being any better than they were.  
But hey, maybe next time I'll add that extra chocolate just to see. 

I did not use any liqueur in my recipe - but I can't wait to try the raspberry version.  I'm sure it's just fabulous.

Chocolate Molten Lava Cakes 
(adapted slightly from Glorious Treats, originally from Paula Deen)
Yield: 6-8 cakes

6 (1 oz) squares bittersweet chocolate (I used 4 - a Ghiradelli bar)
2 (1 oz) squares semi sweet chocolate (I used Bakers)
10 Tbs. butter (salted)
1/2 cup all-purpose flour
1 1/2 cups powdered sugar
3 large eggs
3 egg yolks
1 tsp. vanilla extract
2 Tbs. orange or raspberry liqueur (optional)
Powdered sugar, for dusting (optional)

Preheat oven to 425°F. 
Grease 6 (6 oz) or 8 (4 oz) custard cups/ramekins.  
Melt the chocolates and butter in the microwave or in a double boiler.  Add the flour and sugar to chocolate.  Stir a few times.  Add the eggs and egg yolks and stir until smooth.  Stir in the vanilla and liqueur if using.  
Divide the batter evenly among the ramekins.  Place on a baking sheet and bake for 14 minutes if using 6 dishes, 12 minutes for 8 dishes.  The edges should be firm but the center will be jiggly or runny.  
Cool for a couple of minutes, then eat directly from dish or run a knife around the edge to loosen and invert cakes onto dessert plates.  
Dust with powdered sugar before serving, or dollop with sweetened whipped cream or vanilla ice cream.  


Monday, February 11, 2013

Chocolate Chip Pull Apart Bread - SRC


This month I had the pleasure of being assigned to The Tasty Cheapskate for the Secret Recipe Club, where Jeanie highlights frugal recipes, eating well, and uses lots of butter.  I know we'd be great friends!
And she even has 4 kiddos, around the same age as mine.  She's got a great sense of humor and is very entertaining to read....and man, does she have some fantastic recipes.

I had such a hard time picking one to make for today.....with choices like Brownies with Browned Butter Frosting (I am SO making those....soon.), No-Rise Cinnamon Rolls with Blueberry Filling , Double Chocolate Breakfast Cookies (yes, yes, yes!) and Diana's Apple Cake of Awesomeness (which I actually made, and it was delicious!).

I ended up settling on this pull-apart bread - because I have been wanting to try different versions of  pull-apart bread for months and hadn't gotten around to it.

So it's basically a sweet and tender yeast dough, rolled flat and brushed with butter, coated with cinnamon and sugar, and sprinkled with chocolate chips. You cut it into strips, stack them on top of each other, cut the stack into sections, and stick them in a loaf pan.  Once it's baked, you slather it with a lovely cream cheese frosting and try to keep from eating the whole loaf before dinner.

I only have two things that I will change the next time I make this....

First, I'll add a little salt to the dough, maybe half a teaspoon.  I think all yeast doughs need a little bit of salt.  I'm changing the recipe to reflect that preference.

Second, I won't sprinkle the chocolate chips on until I'm stacking the strips of dough....because they all just kept falling off when I moved the strips.

Thanks, Jeanie, for such a scrumptious bread, and I love your blog and great collection of recipes!

Chocolate Chip Pull-Apart Bread (adapted slightly from The Tasty Cheapskate)

Bread:
1/4 cup butter, melted
1/3 cup milk
1/4 cup warm water
1/4 cup sugar
1 T. yeast
1-1/2 tsp. vanilla
2 eggs, beaten
2-3/4 cups flour (plus a little more if necessary)
1/2 tsp. salt

Filling:
1/4 cup butter, softened or melted
1/4 cup white sugar
1/4 cup brown sugar
1 tsp. cinnamon (optional)
2/3 cup chocolate chips, chopped

Frosting:
1/2 package cream cheese (4 oz), softened
2-1/2 T. butter, softened
1/2 T. sour cream (optional)
1/2 cup plus 2 T. powdered sugar
1/2 tsp. vanilla extract

To make the dough, heat milk, butter, and water together in microwave or on the stove until the butter melts. Cool (if necessary) to about 110°.
Mix in sugar and yeast.  Add beaten eggs and vanilla and stir well.
Stir in 1 cup flour.  Then add the second cup.  Knead in an electric mixer with the dough hook or turn out to a floured surface and knead by hand.  Add additional flour as necessary to make a slightly firm dough.

Put in a greased bowl, cover with greased wax paper or a wet towel, and let it rise until doubled, about an hour.

Once it's risen, punch it down, then put on a lightly floured surface and roll it out to about 12x20".
Spread softened or melted butter all over the dough.
Combine the sugars and cinnamon and sprinkle evenly over the top.

Cut the dough into 6 even strips.  Sprinkle some chocolate chunks on the bottom strip, then top with another strip.  Sprinkle that strip with chocolate and top with another strip.  Continue until you have one nice stack.
Cut the stack into 6 equal chunks.
Place the chunks in a greased 8x5" bread pan with the cut sides up.
 Let rise for 20-40 minutes.  Place pan on a cookie sheet in case it overflows (mine did...maybe my pan was too small!) and bake at 350° for 30-40 minutes, or until browned and no longer gooey.
Remove from oven and let cool in pan for 10 minutes.  Loosen the sides and turn it onto a plate (right side up) to cool completely.

To make frosting, beat together the cream cheese, butter, and sour cream.  Add vanilla.  Beat in powdered sugar until smooth.  Spread over bread while it's still warm.


Tuesday, February 5, 2013

DIY Pizza Sauce


I don't know about your family, but mine goes crazy for pizza.  
I most commonly make Barbecue Chicken Bacon Pizza, but lately I've been making this sauce
and just making plain bacon pizza.  
I've tried several variations on homemade pizza sauce over the years, and this one tops them all.

Grant was so surprised when he first tasted it......he declared it his absolute favorite sauce.  
Now, the original recipe called for 2 tsp. of red pepper flakes - I thought that would be a little much for our tastes and toned it back to half a teaspoon.  It's just right for our family - but you can certainly up the heat factor if you want. 

I love that it makes a big batch and I can freeze half for later.....making my next pizza baking day a lot easier.  I love that it has no artificial ingredients or corn syrup or anything objectionable like that, unlike the store bought sauces.  And I love that it's so inexpensive to make.  

You can leave the sauce chunky with the tomatoes if you prefer - but since I have several kids who swear they don't like tomatoes, I don't dare even try that option.  Smooth is best for us.  I run it through the blender for a few seconds and we're good to go.  Everyone's happy, and the pizza is delicious.  


DIY Pizza Sauce (adapted slightly from Annie's Eats)

28 oz. can diced tomatoes, undrained
3 T. olive oil
1 T. dried basil
1 tsp. dried oregano
1/2 tsp. dried marjoram
1/2 tsp. crushed red pepper flakes (more if you want)
1/2 tsp. salt
1 tsp. sugar
3-4 cloves of garlic, finely minced

Combine all ingredients in a medium saucepan over medium-high heat.  Bring to a boil, then reduce the heat to a simmer.  Allow to cook for at least 15 minutes.  Remove from heat.  If you prefer a smoother sauce, pour the sauce into a blender and process until chunks of tomatoes are broken up.  You could also use an immersion blender if you have one.  You can leave it chunky if you prefer.
Store in an airtight container in the refrigerator.

Yield:  Enough for 5-6 14" pizzas, depending on how thick you like your sauce.

Monday, February 4, 2013

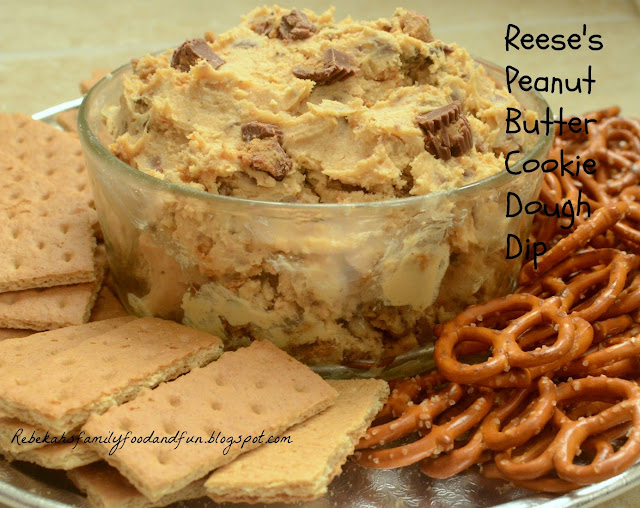
Reese's Peanut Butter Cookie Dough Dip


We actually did watch the Superbowl last night.

See, Grant is a Niner's fan....in theory.  Being that he's from San Jose, CA, which is just miles away from San Francisco, he grew up being loyal to the local team.....and although he hasn't watched a game of theirs in probably 20 years, when we found out they were in the Superbowl, we had to watch.

Completely over-hyped, in my personal opinion.....all the hoop-la over football.  That was a solid 4 hours and 15 minutes of my life.....and if it wasn't for the food and good company, I would consider it a complete waste of time.  (Plus, we had to miss Downton Abbey - which I recorded, but we haven't seen it yet.)
Even the commercials were disappointing for the most part, and don't even get me started on the half-time show.  Ugh.  Be a lady and use your amazing voice for something good, whydoncha?  And put on some clothes while you're at it.  Okay.  Soapbox over.

But good food and good company there was.....and this was my favorite dish of the night.

Chunks of peanut butter cups swirled in a creamy peanut butter flavored cream cheese and brown sugar dip.......perfect on graham crackers or pretzels....although I preferred the graham crackers.  So. so. so. scrumptious.  Like, dangerous to have in the house because I might just sit down and eat the whole bowl, scrumptious.

Fortunately for me, my family agreed with me on its deliciousness and I have lots of competition to get my fair share of the stuff.  I mean, I had the tiny bit of leftovers out for like three seconds and suddenly two of my kids appeared out of the wood-works and were snatching bites as fast as they could.

Yup.  New favorite.  And I won't wait till we watch another football game to make more.


Reese's Peanut Butter Cookie Dough Dip (from Shugary Sweets)

1/2 cup butter (I used salted)
1/2 cup light brown sugar
1/4 cup creamy peanut butter
1 tsp. vanilla extract
8 oz cream cheese, softened
3/4 cup powdered sugar
1/2 cup semi-sweet mini chocolate chips
1-1/2 cups chopped Reese's cups (or an 8 oz package Reese's peanut butter cup Minis)

In a small saucepan over medium heat, melt butter and brown sugar.  Whisk until completely combined and bring to a boil, then remove from heat.  Whisk in the peanut butter and vanilla extract.  Set aside to cool to room temperature.

In a large mixing bowl, beat cream cheese with powdered sugar until creamy.  On low, add in cooled brown sugar mixture.  Mix until combined.  Fold in mini chocolate chips and chopped Reese's cups.  Serve immediately or store in refrigerator until ready to serve.

Enjoy with animal crackers, graham crackers, or pretzels.
Related Posts Plugin for WordPress, Blogger...